Mastering the New York Strip Roast: A Guide to Tender Perfection
There are few culinary experiences as satisfying as presenting a beautifully roasted, perfectly tender piece of beef. Among the pantheon of impressive roasts, the New York Strip Roast stands tall, offering an exquisite balance of rich flavor and melt-in-your-mouth tenderness. Whether you're planning an elegant dinner party, a festive holiday meal, or simply want to elevate a family gathering, mastering this cut promises to leave a lasting impression on your guests and your taste buds. Forget intimidation; with the right techniques – particularly dry-brining and reverse-searing – you can achieve restaurant-quality results in your own kitchen.
Understanding the Star: What is a New York Strip Roast?
Before we dive into the cooking process, it's essential to understand the unique characteristics of this magnificent cut. The New York Strip Roast is a large, boneless section of beef derived from the top of the short loin, located behind the ribs in the center back of the cow. This particular muscle group is not overly exercised, which directly contributes to its inherent tenderness – a hallmark characteristic that makes it a prime candidate for roasting.
What truly sets the New York Strip Roast apart is its excellent intramuscular fat distribution, known as marbling, and a distinct fat cap on top. This marbling is crucial; it slowly renders during cooking, infusing the meat with incredible juiciness and intensifying its already rich, beefy flavor. When this generous cut is portioned, it yields the popular individual New York strip steaks. However, keeping it whole for roasting unlocks a different dimension of flavor and texture, making it an ideal centerpiece for any special occasion.
Selecting the Perfect Roast: Quality Matters
The journey to a perfect New York Strip Roast begins at the butcher's counter. Choosing the right quality beef is paramount to achieving that coveted tender and flavorful outcome. This cut is celebrated for its robust taste and luxurious texture, making it a popular choice for high-end restaurants and memorable home celebrations alike. For more insights on this, you might find our article New York Strip Roast: The Ultimate Entrée for Special Occasions particularly helpful.
When selecting your New York Strip Roast, look for a cut that is at least 1.5 to 2 inches thick. Thickness contributes to more even cooking and helps prevent the roast from drying out. But the most critical factor is the marbling:
- Marbling: Seek out a roast with an even distribution of fine white flecks of fat throughout the muscle. This intramuscular fat is your guarantee of moisture, tenderness, and rich flavor.
- Beef Grades: Understanding beef grading is key to making an informed choice. The USDA grades beef based on its quality, tenderness, juiciness, and flavor:
- Prime: This is the highest grade, characterized by abundant marbling. Prime beef is exceptionally tender, juicy, and flavorful, making it the top choice for a truly special roast.
- Choice: A high-quality grade that is widely available. Choice beef has less marbling than Prime but still offers a good balance of tenderness and flavor. It's an excellent option for a delicious roast.
- Select: This grade is leaner with less marbling. While still good, it may result in a slightly less tender and flavorful roast compared to Prime or Choice.
For a truly exceptional New York Strip Roast, always aim for a Prime or Choice grade. The investment in a higher-quality cut will undoubtedly pay dividends in taste and texture.
Preparing for Perfection: Essential Pre-Cook Steps
Proper preparation is just as critical as the cooking method itself when aiming for tender perfection. These foundational steps ensure your New York Strip Roast is ready to absorb flavor and cook evenly. For a deeper dive into these techniques, explore Choose & Prepare Your Strip Roast: Prime Flavor Secrets.
1. Trimming the Fat
Your New York Strip Roast will likely have a thick fat cap on one side. While some fat is desirable for flavor and moisture, an excessively thick layer can prevent a good crust from forming and make the roast greasy.
- The Goal: Trim the fat cap down to about ⅛ to ¼ inch thick. This ensures enough fat remains to baste the meat and develop a crispy exterior without overwhelming the roast.
- Technique: Use a sharp boning knife or chef's knife. Carefully slide the blade between the fat and the meat, removing large chunks. You can also score the remaining fat cap in a crosshatch pattern (without cutting into the meat) to help it render more evenly during cooking.
2. Dry-Brining for Deep Flavor
Forget surface-level seasoning. Dry-brining is a transformative technique that draws moisture from the meat, creates a concentrated brine on the surface, and then allows the seasoned liquid to reabsorb, resulting in deeply seasoned and incredibly juicy meat. This is far more effective than simply seasoning right before cooking.
- The Method: Generously coat the entire roast with coarse salt (like kosher salt). You can also add freshly cracked black pepper and other aromatics like garlic powder, onion powder, and dried herbs (rosemary, thyme).
- Timing is Key: Place the seasoned roast on a wire rack set over a baking sheet and refrigerate, uncovered, for at least 12-24 hours, or even up to 3 days. The longer it brines, the deeper the flavor penetration and the drier the surface, which is ideal for a superior crust.
3. Tying the Roast
If your New York Strip Roast isn't already tied by your butcher, it's a worthwhile step to do yourself.
- Why Tie? Tying helps the roast maintain a uniform shape throughout cooking. This ensures even heat distribution, preventing thinner sections from overcooking while thicker parts remain undercooked. It also creates a more aesthetically pleasing presentation.
- How to Tie: Use butcher's twine (oven-safe cotton twine). Make individual loops every 1 to 1.5 inches along the length of the roast, pulling them taut but not overly tight. A series of simple surgeon's knots works well.
The Art of Cooking: Reverse-Searing for Unmatched Tenderness
While a New York Strip Roast can be cooked at various temperatures, the reverse-sear method is widely regarded as the gold standard for achieving unparalleled tenderness, juiciness, and a perfect edge-to-edge doneness with a beautifully crusty exterior.
What is Reverse-Searing and Why Does it Work?
The reverse-sear involves cooking the roast slowly at a low temperature until it reaches a specific internal temperature, then finishing it with a high-heat sear. This method:- Ensures Even Doneness: The low, slow cooking minimizes the "gray band" typically seen in conventionally roasted meats, resulting in a more uniformly pink interior.
- Maximizes Tenderness: Gentle cooking allows the meat's connective tissues to break down slowly, making it incredibly tender.
- Develops a Superior Crust: The initial slow cook dries out the surface of the meat, setting it up for an amazing, deeply browned crust during the final high-heat sear.
Step-by-Step Reverse-Searing Your New York Strip Roast:
- Bring to Room Temperature: After dry-brining, remove the roast from the refrigerator about 1-2 hours before cooking to allow it to come closer to room temperature. This promotes more even cooking.
- Low-Temperature Roast:
- Preheat your oven to a low temperature, typically 225°F to 275°F (107°C to 135°C).
- Place the roast on a wire rack set inside a rimmed baking sheet.
- Insert an oven-safe meat thermometer into the thickest part of the roast, avoiding bone or fat.
- Roast until the internal temperature reaches about 10-15°F below your desired final doneness. For medium-rare (target 130-135°F), aim for 115-120°F. This can take anywhere from 1.5 to 3 hours, depending on the size and initial temperature of your roast.
- First Rest (Crucial!): Remove the roast from the oven and let it rest, still on the wire rack, for at least 15-30 minutes. This allows the heat to redistribute and juices to settle, preparing it for the sear.
- High-Heat Sear:
- While the roast rests, preheat a heavy-bottomed skillet (cast iron is ideal) over high heat until it's smoking lightly. Add a high smoke-point oil (like grapeseed or avocado oil).
- Carefully place the roast in the hot skillet. Sear intensely on all sides, including the ends, for 2-3 minutes per side, until a deep, crusty brown develops.
- For extra flavor, you can add a tablespoon of butter, a few sprigs of fresh rosemary or thyme, and crushed garlic cloves to the pan during the last minute of searing, basting the roast generously with the herb-infused butter.
Finishing Touches: Herb Butter & Resting for Ultimate Juiciness
The journey to tender perfection isn't complete without these final, crucial steps.
Herb Butter Infusion
As soon as your New York Strip Roast comes out of the searing pan, slather it generously with an aromatic herb butter. A simple mixture of softened unsalted butter, minced garlic, fresh chopped rosemary, thyme, and parsley will melt beautifully over the hot crust, seeping into every crevice and adding an incredible layer of flavor and richness. This step transforms an already delicious roast into an unforgettable culinary masterpiece.
The Golden Rule: The Final Rest
Perhaps the most overlooked, yet vital, step in roasting any large cut of meat is the final rest. After searing, immediately transfer the roast to a clean cutting board, tent it loosely with foil, and let it rest for a minimum of 15-20 minutes (for larger roasts, up to 30 minutes). This allows the internal temperature to equalize and the muscle fibers, which contracted during cooking, to relax and reabsorb all those delicious juices. Skipping this step means a dry, less flavorful roast.
Carving Your Masterpiece
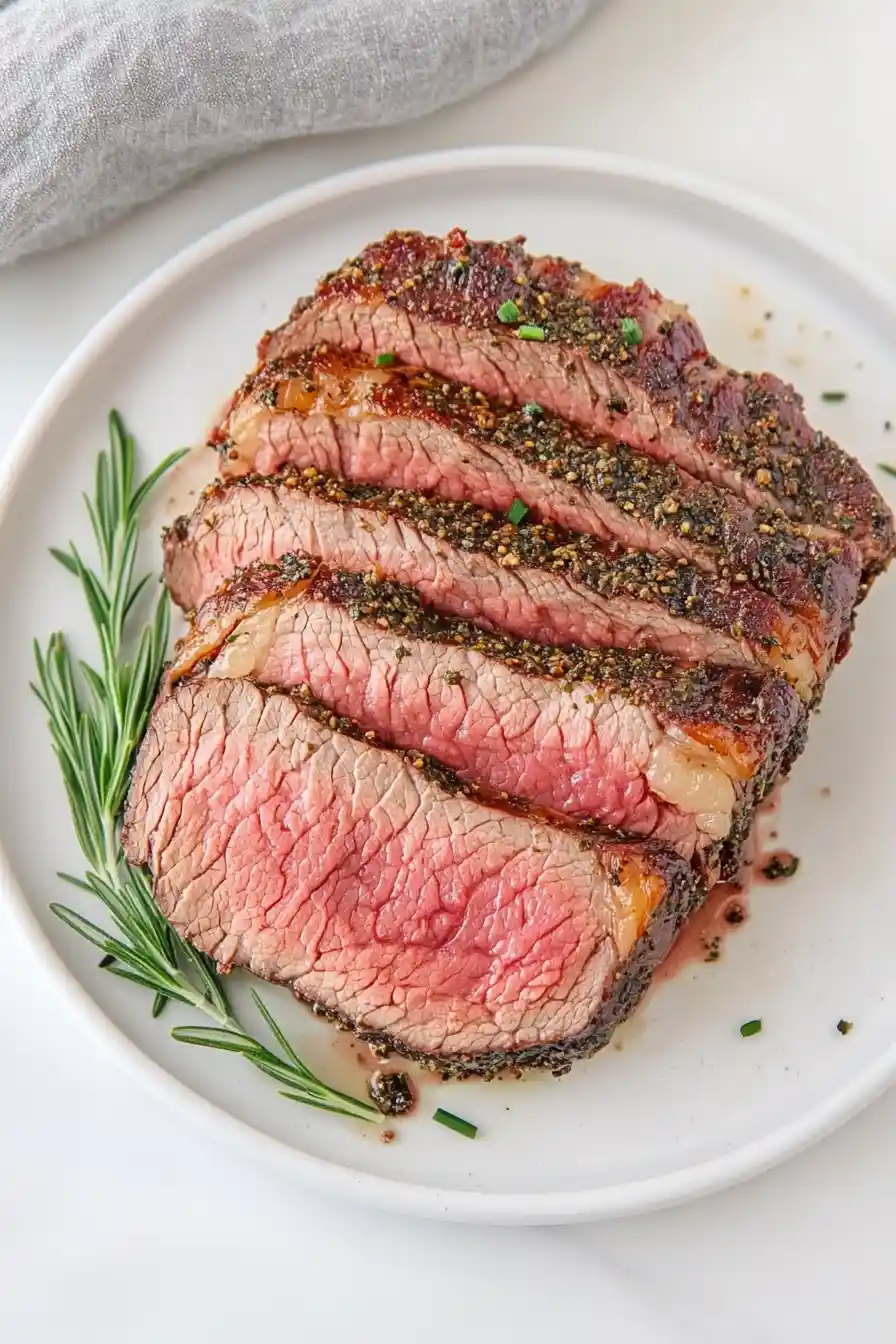
Once rested, remove the twine and carve the New York Strip Roast against the grain into thick, impressive slices. Cutting against the grain shortens the muscle fibers, ensuring each bite is incredibly tender. Arrange the slices on a platter, perhaps with a drizzle of the pan juices or any remaining herb butter, and prepare for rave reviews.
Mastering the New York Strip Roast is a truly rewarding endeavor. By understanding the cut, making smart choices at the butcher, meticulous preparation, and employing the transformative reverse-sear method, you can consistently achieve a roast that is not only tender and juicy but bursting with rich, savory flavor. This guide equips you with the knowledge and techniques to create a show-stopping entrée that will impress even the most discerning palates and become a cherished centerpiece for your most memorable meals.